How to Level Sand for Pavers: The 1-Inch Screed Method (ICPI-Approved)

Need Exact Math for Your Project?
Launch our free online tool: Sand Calculator & Estimator
How to Level Sand for Pavers — Assembly Anatomy
Interactive 3D Isometric Engineering Rig • Verified Model
A perfectly flat paver patio lives or dies by the quality of your sand bed. Here's exactly how to get it right.
I've screeded thousands of square feet of paver leveling sand over the years — driveways, pool decks, fire pit patios, commercial plazas. And every single time, the process comes down to the same fundamentals: right sand, right depth, right technique. Mess up any one of those three and you'll feel it under your feet within a year. Wobbly pavers, puddles that won't drain, lips that catch chair legs.
The good news? Screeding isn't complicated. It's a skill you can learn in an afternoon. But there are details the YouTube videos skip — details that separate a patio that lasts two decades from one that looks wavy by next spring.
TL;DR
Use ASTM C33 concrete sand at exactly 1-inch compacted depth. Set metal screed rails on your compacted aggregate base, dump sand between them, pull a straight board across the top, then carefully remove the rails and fill the voids. Don't walk on your screeded bed, don't wet the sand, and maintain a 1/8" per foot slope for drainage. First step — figure out how much sand you need: Sand Calculator
What You Need Before You Start
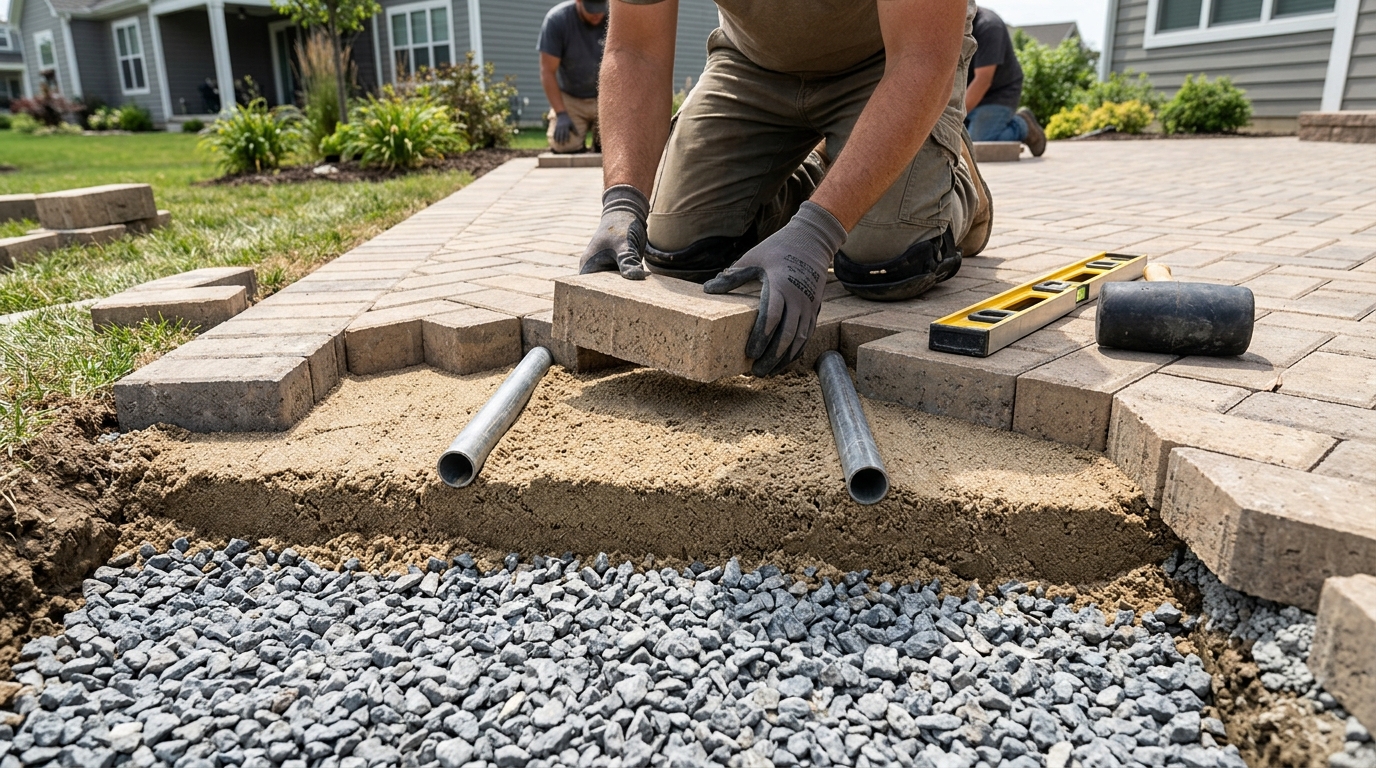
Before you touch a grain of sand, gather everything. Nothing kills momentum like a mid-project hardware store run.
Materials:
- ASTM C33 concrete sand — angular, coarse, well-graded (see below for why this matters)
- 1-inch OD metal pipes or electrical conduit — these are your screed rails
- Straight 2×4 lumber or aluminum screed bar — at least 2 feet wider than the gap between your rails
- Landscape fabric (optional — I'll address the debate shortly)
- Plate compactor — rented or owned, for compacting your aggregate base before screeding
Tools:
- Wheelbarrow and flat shovel
- Rake (garden or landscape)
- 4-foot level
- String line and stakes
- Rubber mallet
- Hand trowel for detail work
First step — figure out your sand quantity so you can buy or order before demo day. Use the Sand Calculator to get exact bags or cubic yards for your dimensions. Nothing worse than running short with a half-screeded bed baking in the sun.
Why Exactly 1 Inch? The ICPI Research
Why not a half inch? Why not two inches? Because the Interlocking Concrete Pavement Institute tested it — extensively — and published the answer in ICPI Tech Spec 2.
The bedding sand for pavers must be 1 inch (25 mm) compacted thickness. Here's the reasoning:
- Less than ¾ inch: You can't get a smooth, consistent screed. The sand layer is so thin that any slight imperfection in your aggregate base telegraphs straight through to the paver surface.
- More than 1.5 inches: Pavers start to rock and shift. Thick sand beds allow differential settling — one corner of a paver sinks deeper than the other, creating lips and wobble. I've torn out patios where someone laid 2+ inches of sand, and the surface looked like ocean waves.
The critical thing to understand: the sand is NOT structural. It's a leveling layer — a thin cushion that lets you fine-tune the surface after your aggregate base does the heavy lifting. The compacted gravel base (typically 6–8 inches of processed aggregate) carries the load. The sand just makes it smooth.
That's why getting the depth right matters so much when you're working with paver leveling sand. Too thick and it becomes a liability. One inch is the proven sweet spot.
For a deep dive into the right material for this layer, check out our complete guide to concrete sand for pavers.
Choosing the Right Paver Leveling Sand
Not all sand is created equal, and this is where I see DIYers go wrong more than almost anywhere else. The correct paver leveling sand is ASTM C33 coarse concrete sand — the same spec used for mixing concrete and mortar.
What makes it special? The grains are angular — meaning they have rough, irregular edges that lock together under compaction like tiny puzzle pieces. You can feel the difference if you rub C33 between your fingers — it's gritty, almost sharp, compared to the smooth roundness of beach sand.
What to use:
- ✅ ASTM C33 concrete sand (also called "sharp sand" or "coarse sand" at some yards)
- ✅ Manufactured sand (M-sand) meeting C33 gradation
What NOT to use:
- ❌ Polymeric sand — That's for filling joints between pavers after they're laid. It hardens when wet. Using it as bedding is an expensive disaster.
- ❌ Mason sand — Too fine and uniform. It holds water like a sponge, drains poorly, and lets pavers shift under load.
- ❌ Stone dust / quarry screenings — This one's a trap. It looks like sand, it's cheap, and some contractors still use it. But when stone dust gets wet, the calcium carbonate fite particles cement together and become rigid — then crack and heave with freeze-thaw cycles. I wrote a full breakdown on why stone dust fails under pavers.
- ❌ Play sand — Rounded, uniformly sized grains with zero interlock. Your pavers will shift like they're sitting on ball bearings.
For more on ASTM specifications, gradation charts, and what to ask for at the supply yard, read our guide on bedding sand for pavers.
Step-by-Step Screed Process

Here's the method I use on every job. Seven steps, and if you follow them faithfully, you'll end up with a sand bed so flat you could eat dinner off it.
Step 1: Compact the Aggregate Base
Your aggregate base should already be installed and compacted to final grade — typically 6–8 inches of compacted processed gravel (¾-minus or similar). Run the plate compactor in at least three overlapping passes. The surface should feel rock-hard when you walk on it. If your boot leaves a print, it's not done.
Check the grade with a string line. The base should slope 1/8 inch per foot away from your house or structure for drainage. Get this right now — you can't fix it with sand later.
Step 2: Set Screed Rails
Lay your 1-inch OD metal pipes (or conduit) directly on the compacted base, parallel to each other, 4 to 6 feet apart. The outside diameter of the pipe is your depth gauge — when you pull sand across the top of these rails, you'll leave exactly 1 inch of leveling sand for pavers beneath the screed board.
A few tips from the field:
- Use a level across both rails to make sure they're at the same height relative to each other.
- For sloped areas, set the rails to follow your drainage grade — don't try to level them perfectly horizontal unless your base is already dead flat.
- Press the rails gently into the base so they don't roll. A small mound of sand at each end can keep them in place.
Step 3: Dump Sand Between the Rails
Shovel or wheelbarrow your concrete sand for pavers into the gap between the rails. Dump enough that it's slightly higher than the top of the rails — maybe ½ inch proud. You want enough material that the screed board is always pushing sand, never dragging through air pockets.
Spread it roughly with a rake so you're not fighting a huge mound on one end. Don't worry about precision here — that's what the screed board is for.
Step 4: Pull the Screed Board Across the Rails
Rest your 2×4 or aluminum bar across both rails and pull it toward you in a slow, steady motion. Use a slight sawing side-to-side action as you pull — this helps the board cut through the sand cleanly rather than bulldozing a wave in front of it.
Keep the board pressed down firmly on both rails. If it lifts off one side, you'll leave a high spot. I usually do this with a partner — one person on each end of the board — for sections wider than 5 feet.
The first pass won't be perfect. That's expected.
Step 5: Fill Low Spots and Re-Screed
After the first pass, you'll see voids, divots, and thin areas where the sand didn't fill completely. Toss handfuls of sand into those low spots, then pull the screed board across again. Two passes usually does it. Three if you're picky (I'm always picky).
Look along the surface at a low angle — like sighting down a rifle. You'll spot waves and dips that you can't see from above.
Step 6: Carefully Remove the Screed Rails
Here's where patience earns its paycheck. Reach down and gently lift each pipe straight up and out. Don't twist, don't drag. Straight up. The sand on either side should hold its shape if you've done the screeding right.
You'll be left with two narrow troughs where the pipes sat — that's normal and expected.
Step 7: Fill Rail Voids with Sand by Hand
Using a hand trowel, carefully fill the rail voids with sand for paver base. Smooth it level with the surrounding surface using the flat of your trowel. Don't pack it aggressively — just fill, smooth, and move on.
This is the one spot where perfection matters. Those filled lines will be under pavers, and any hump or dip will telegraph through.
Important: Once your sand bed is screeded, do not walk on it. Lay pavers starting from one end, kneeling on already-placed pavers as you go. Every footprint is a dip that has to be fixed.
5 Screed Mistakes That Ruin Paver Patios

In my years of paving — and tearing out other people's failed paving — these five mistakes show up again and again:
1. Using the Wrong Sand Type
I've already beaten this drum, but it bears repeating. Mason sand, play sand, stone dust — any of these under your pavers and you're building on a ticking clock. ASTM C33 concrete sand. Accept no substitutes. It's the only proven paver leveling sand backed by ICPI research and field performance.
2. Screeding Too Thick (Over 1.5 Inches)
"More sand means a smoother bed, right?" Wrong. Thick sand beds allow pavers to settle unevenly under load. You'll get rocking, lip faulting, and ponding water within a year. Stick to 1 inch compacted. If your base has dips deeper than an inch, fix the base — don't compensate with extra bedding sand for pavers.
3. Walking on the Screeded Bed Before Laying Pavers
Every footprint is a low spot. Every knee print. Every dropped tool. I've watched helpers casually stroll across a freshly screeded bed to grab a water bottle, and we had to re-screed a whole section. Lay planks if you absolutely must cross the bed, but better to plan your workflow so you never have to.
4. Wetting the Sand Before Screeding
Some old-school guides recommend dampening the sand to make it pack better. Don't. Wet sand clumps, sticks to your screed board, and doesn't spread evenly. It also makes the depth unpredictable — wet sand compacts differently than dry. Screed it dry or at most slightly damp (the natural moisture in the bag or pile is fine). You'll compact it for real later when the plate compactor goes over the finished paver surface.
5. Not Maintaining Slope for Drainage
Your patio needs to shed water — period. The standard drainage slope is 1/8 inch per foot away from the house. If you screed your leveling sand for pavers perfectly flat but your base doesn't have slope, water pools on the surface, migrates through joints, saturates the bedding layer, and eventually undermines the base. Always verify slope with a level before, during, and after screeding.
How Much Leveling Sand Do You Actually Need?
The formula is straightforward: length × width × depth (in feet) = cubic feet of sand. But there are nuances — compaction loss, irregular shapes, pipe voids — that can throw off a napkin estimate by 10–15%.
I always tell homeowners to calculate once, then add a buffer. For a detailed walkthrough of the formula with worked examples and a quick reference table for common patio sizes, check out our guide on how to calculate paver sand. And for the bags-versus-bulk breakdown, see how many bags of sand for pavers.
Or cut straight to the answer — the Sand Calculator handles all the math, including compaction factor, and tells you exactly what to order.
Frequently Asked Questions
Can I use leveling sand for pavers on top of a concrete slab?
You can, but it's a different situation. When overlaying an existing concrete slab, you still use a 1-inch bed of ASTM C33 paver leveling sand. The slab itself acts as your "base," so you skip the aggregate layer. Make sure the slab drains properly — if it ponds water, address that first. The screeding process is the same: rails, screed, remove, fill.
How long can a screeded sand bed sit before laying pavers?
Ideally, lay pavers the same day you screed. A screeded sand for paver base bed is fragile — wind blows it, rain pocks it, cats think it's a litter box. If weather forces a delay, cover the screeded area tightly with plastic sheeting. I've left a covered bed overnight with no issues, but anything beyond 24 hours and I'd plan to re-screed.
Do I need landscape fabric between the base and the bedding sand?
This one sparks debates at every paver installer meetup. The ICPI does not require geotextile fabric between the aggregate base and the bedding sand for pavers. Some installers use it to prevent fines from migrating upward; others skip it, arguing it creates a slip plane. I use it selectively — on clay-heavy soils or areas with high water tables. On well-draining soils with a properly installed base, I leave it out. Either way, it doesn't change how you screed. For the exact sand quantity you'll need on top, use the Sand Calculator.
What's the difference between bedding sand and joint sand?
Bedding sand (also called leveling sand for pavers or setting sand) goes under the pavers as a leveling layer — that's what this whole article is about. Joint sand goes between the pavers after they're laid, filling the gaps to lock them together. Joint sand is usually polymeric (it hardens when misted with water), while bedding sand is always loose ASTM C33 concrete sand. Never swap one for the other.
Compare Quotes from Licensed Landscaping Contractors
Don't want to DIY? Connect with pre-screened local trade professionals verified for active state licensing, general liability insurance, and proven customer satisfaction.
Specializing in construction cost verification, code compliance, and civil engineering benchmarks for SpanSizer.